to CONNECT an IG account
Day 0: Connecting the account/s
Buy Instagram accounts from a trusted supplier.
Connect the IG accounts on Jarvee


Make sure that you’re under Instagram when you add an account

Format for the username and password is like this
Username:password

After ticking the box you have to scroll down to see the settings
Then scroll down again after.


When you proceed to the proxy manager to add a proxy make sure that you select a VALID PROXY

IMPORTANT NOTE: IT IS RECOMMENDED TO CONNECT ONE AVATAR TO ONLY ONE PROXY
In layman's terms, proxies are protectors of your accounts from being flagged or disabled. It serves as a mask of your real IP address and acts as a unique IP address of your accounts (as we all know, having too many accounts connected to a single IP address is flagged as a suspicious activity. Hence, running your accounts without a proxy or a reliable one is a very dangerous step in starting automation.

For reliable 4G proxies, you may reach us at https://thesocialproxy.com/ and you may use DRJARVEE15-3D as a coupon to get 15 Euros discount and 3 days free.
Once you followed the steps, it will appear like this


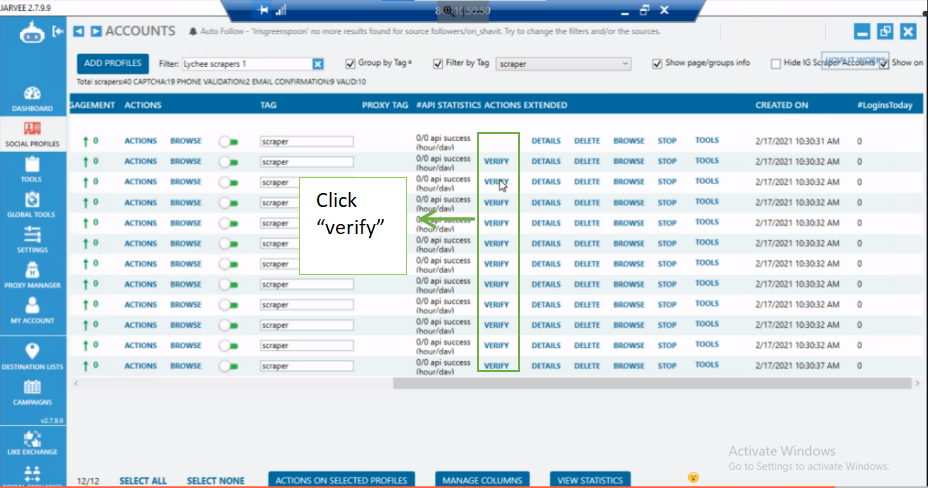
When you reach the SOCIAL PROFILES just scroll down or look for the account that you added. Mind that it has a PENDING status. [ Usually it is located at the bottom part ]


After you click VERIFY ACCOUNT the status will turn to INITIALIZING. The status should be VALID, you can still connect another account while waiting for it to be valid.
Avatar Creation: A How-To Guide
Steps: How to WARM UP an IG account
Day 1: ADDING EMAIL ADDRESS
Click the accounts’ name


Wait for it to load

Once you’re in the accounts’ profile, click EDIT PROFILE
Then scroll down and find EMAIL

After you click SUBMIT, click again Profile

Then click EDIT PROFILE
Scroll down to the EMAIL part
You'll see there a button CONFIRM EMAIL
Click that button so that you will be able to verify the email address


To verify the email address you have to go to GMX.COM

Once you’ll reach this page, click LOG IN

Input the Email and the Password
Then click INBOX

Look for the message containing CONFIRM YOUR EMAIL ADDRESS

Click confirm email address

Then click OK
Email has been verified!
Adding Phone Number
Proceed immediately to profile

Click EDIT PROFILE and scroll down to the PHONE NUMBER part

Input the PHONE NUMBER then click SUBMIT

Click PROFILE
Then click EDIT PROFILE
Scroll down and you’ll see the CONFIRM PHONE NUMBER
After clicking you will be directed to the page where you can input the CODE
Once you will input the code you’re account is good to go and ready for the next process
NOTE
DO NOT FORGET TO PUT THE EMAIL ADDRESS WITH THE PASSWORD AND THE PHONE NUMBER ON THE DESCRIPTION BOX

Day 2: ADDING OF USERNAME AND BIO
Open the account


Click EDIT PROFILE

After adding the username and bio, SCROLL DOWN and click SUBMIT
You can exit the ACCOUNT then do the next step

Day 3 - Follow Actions
First things first, open the account by clicking browse embedded

Once the account is open or accessible follow the step below to do follow action


Steps: How to Import Scrapers in Bulk
First is you need to go to the server where you can create a sheet for importing
If you already open the server and you're in the Social Profile go directly to ADD PROFILE

Once you click Add Profiles follow the instruction below in order to reveal the sheet for importing

Here’s the sheet for importing
You need to remove the written text in the sheet. How? Follow the instructions below:
Highlight row 2, 3 and 4

After which, right click and click CLEAR CONTENTS

Note: Buy before or after scrapers from a trusted supplier
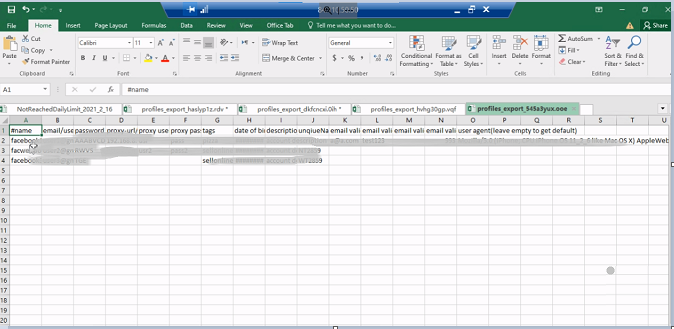
If you already have with you your scrapers, you need to copy it .
After that you need to open another sheet (see photo)

Note: That sheet will be the placement of the scrapers that you copied or bought. Keep in mind that you cannot simply paste the scrapers directly into the sheet.
You need to open a NOTEPAD first
PASTE the scrapers IN the NOTEPAD
COPY it AGAIN
Then PASTE it in the SHEET
So it will look like this..

Next, you need to follow this for the scrapers
HIGHLIGHT first the column where you paste the scrapers
Click DATA
Then CLICK SPLIT TEXT FOR THE COLUMN
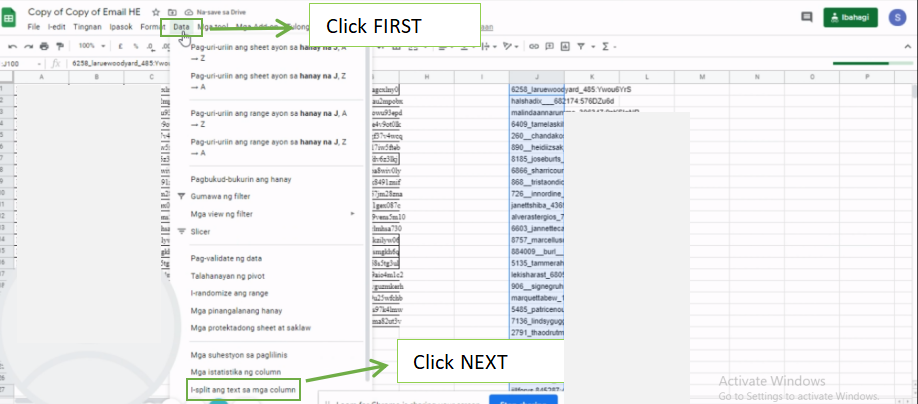
For the SEPARATOR, you need to IDENTIFY the separator on the scrapers it self
(It could be a COLON, SEMICOLON, COMMA or etc)
You go directly here (see photo) and click to choose for the separator

(If you will choose for a separator you can click CUSTOM and select the right separator for the scrapers)
Next HIGHLIGHT the scrapers (username and password) then go to the sheet in the server (show demo import file).
Paste the scrapers in the sheet

Type the name of your scrapers

Note: Put also a number right before the name of your scrapers
Example: avatar scrapers 1
In order for the automatic input of the name, double click the arrow under the name of your scrapers (see photo)

For the next columns which are columns D E and F , those are for the proxy
(proxy url, username, password)To get the it, go back to the sheet where you paste the scrapers first
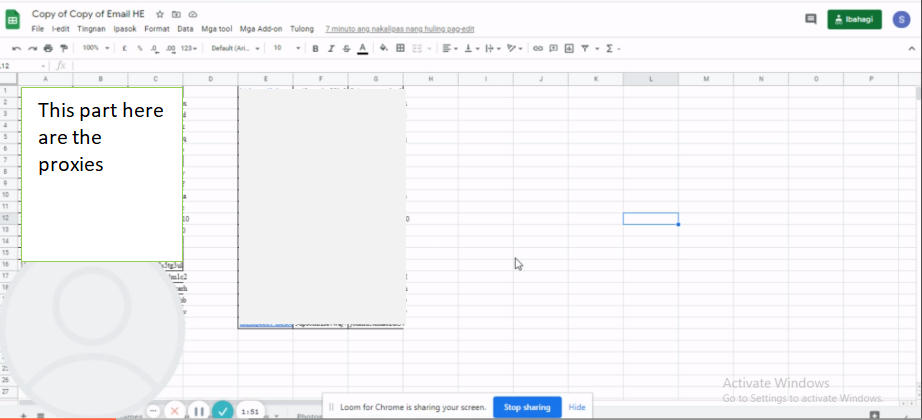
You need to copy proxy url, username and password (it depends on the amount of proxy you bought)
Go back to the sheet where you have your scrapers

After that go to the TAGS and put scraper (keep in mind that you should input SCRAPER not SCRAPERS

Next is to input the DEFAULT EMAIL VALIDATION PORT which is 993

Then SAVE it (CTRL S)
Of course you need to close the file in order for it to be usesable but before closing it totally you need to familiarize or memorize the file name
After that you can close the file
Next, you go to the server where you want to import the said scrapers and follow the instructions below:


Look for the file (usually it is located in the Quick Access)

Once you found the name, click it once and click open then wait for it to be visible
It will turn out like this after you open the file that you saved.

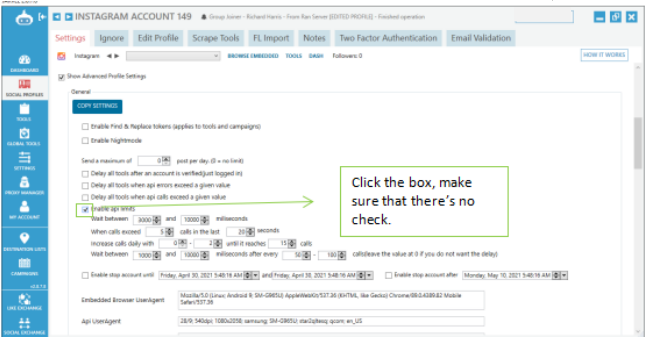
It's not the end yet, we still need to set up the settings. How? Follow these steps:
Double click the name of the scraper to open
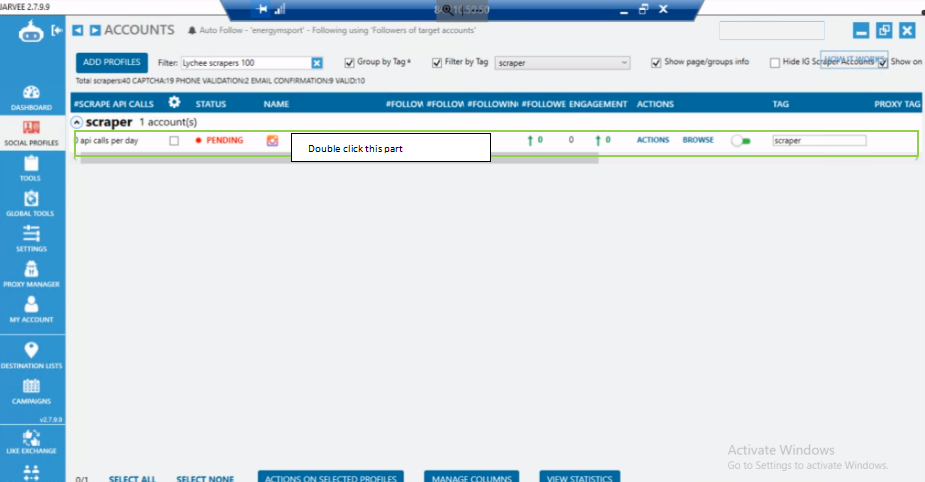
Once you're here in this part you need to scroll down a bit

Tick the box shown in the picture to start setting up the settings

Make sure to uncheck the box shown in the picture
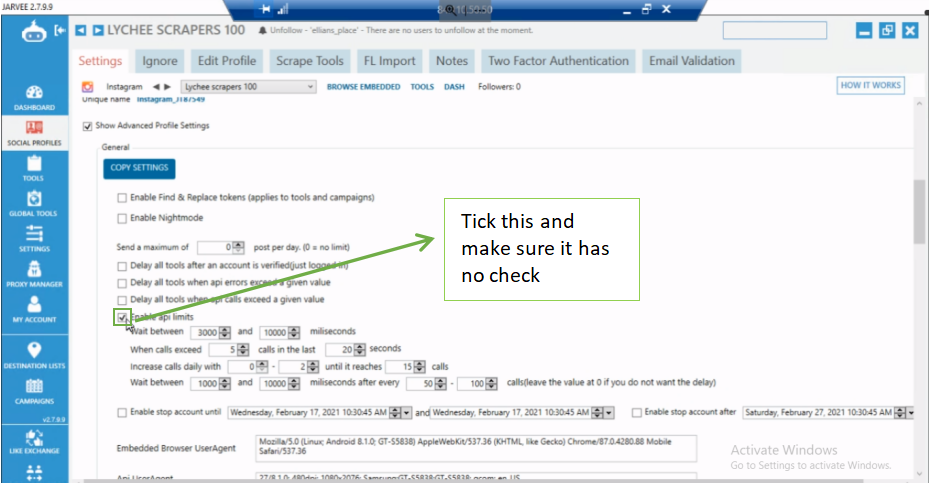
Make sure to see that these three has check

Check the bottom part of the settings and make sure that these boxes has no checks

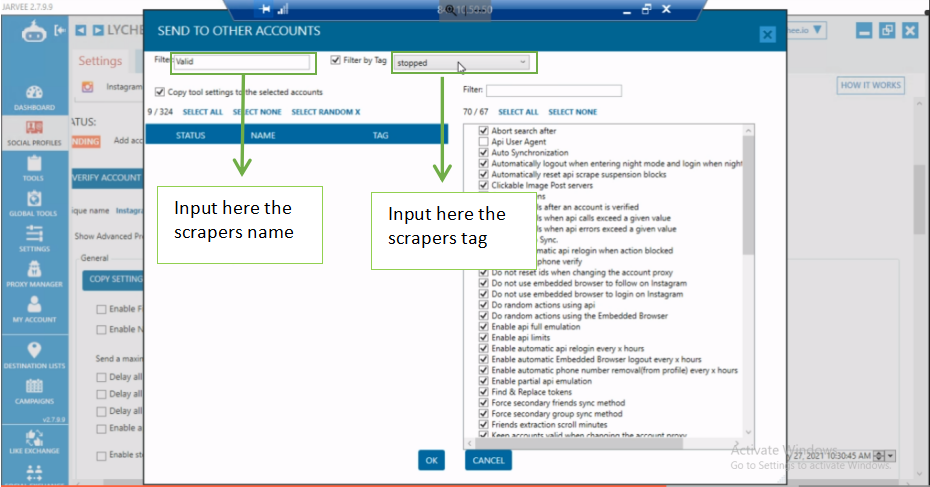
For you to copy the settings from the first account to the other accounts do the following steps:
Click Copy Setting

Before anything else, click first SELECT NONE then do the steps on the picture
NOTE: Please be reminded that there should always be a minus 1 in your scarpers take for example: (See photo)
The amount of scraper being imported [here] is 100, so the number of accounts that needs settings to be set up is 99

After that you click Select All
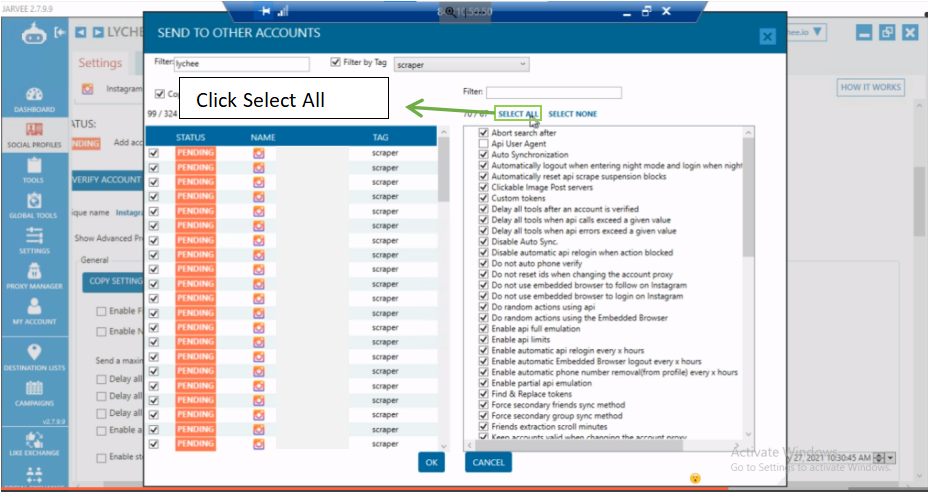
Follow the instructions on the picture

After that, click OK to finish setting up

Next step is to go back to social profiles to VERIFY the scrapers, so click SOCIAL PROFILES

Scroll to the right a little bit then click VERIFY to make the scrapers VALID
OR you can do the other way around
To verify the scrapers and if it's not that a lot, click SELECT ALL
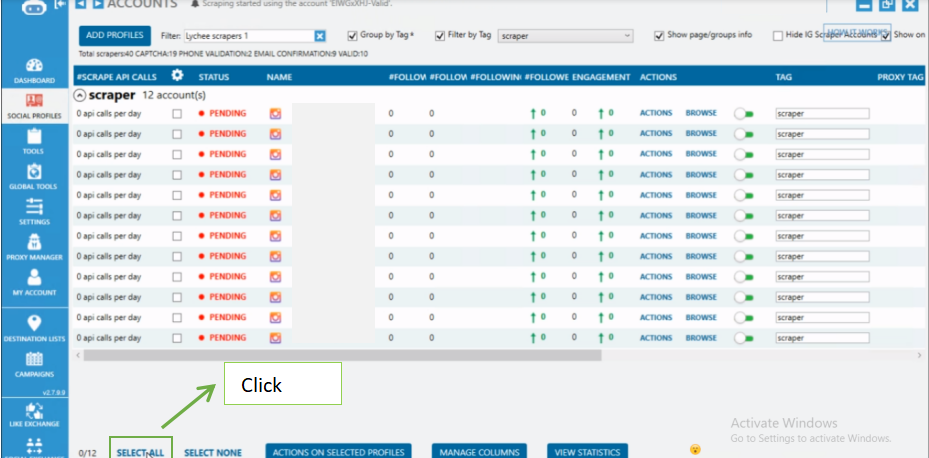
Then click ACTIONS ON SELECTED PROFILE

Scroll down a bit, look for VERIFY PROFILES, click and wait for the accounts’ status to be valid

How to Create Campaign and Destination List for Reposting
First things first, go to the server
Let's start creating the campaign first. Click CAMPAIGN

Click ADD CAMPAIGN next

Click ADD STANDARD CAMPAIGN

Name your campaign

Next is the DESTINATION LIST

Then click DESTINATION LIST to create one

Just like the CAMPAIGN of course you need to name the DESTINATION LIST to easily identify it.

The purpose of the names is to identify where to repost the content
To start, go to SOCIAL PROFILES and select from the newly warmed up avatars
[Given that you already chose an avatar]
You have to name the avatar the destination lists’ name that you did
EXAMPLE : the CAMPAIGN and DESTINATION LISTS’ name is FEMALE 22 so you also need to put FEMALE 22 on the AVATARS’ name (SEE PHOTO)

Go back to DESTINATION LIST

Then look for the DESTINATION LISTS’ name that you created, then click

Go to filter, type the name and DON'T FORGET to CHECK the boxes

Next, go to CAMPAIGN

Once you click campaign, look for the campaign’s name and click
Then go to WHERETO PUBLISH

Then you will be directed here after clicking the Destination list. Make sure that the box has a check mark

Click WHERE TO PUBLISH and FOLLOW the settings on the picture

For your information, all of the scraped photos/post will be placed here in the POSTLIST

IMPORTANT NOTE: Make sure to review everything afterwards.
How to do Reposting for Avatars
First is to check what account you'll going to do reposting
Then you need to get the LINK of the account that you will do reposting (meaning the link of the account that you’ll get pictures/posts with)
[ Note: You don't need to copy the whole link, just the USERNAME ]
You go to SOCIAL PROFILES and look for the tag SCRAPERS

This will be the time that we will use the scrapers we imported earlier
Choose a scraper and click it to open

Once you already click it, you have to name the scraper to avoid confusion and to easily identify it.

After putting a name, you go to tools

Then go to REPOST

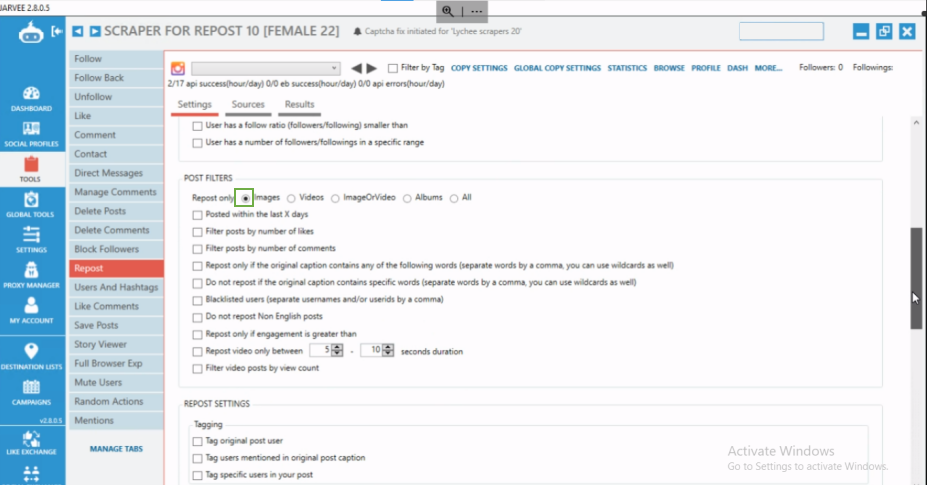
Next is you need to go to SETTINGS first, then copy the settings on the picture

Scroll down and click ONLY the IMAGE
Make sure to click the box (see picture) and look for the CAMPAIGN NAME that you created

Scroll down and keep in mind to REMOVE THE TEXT IN THE BOX

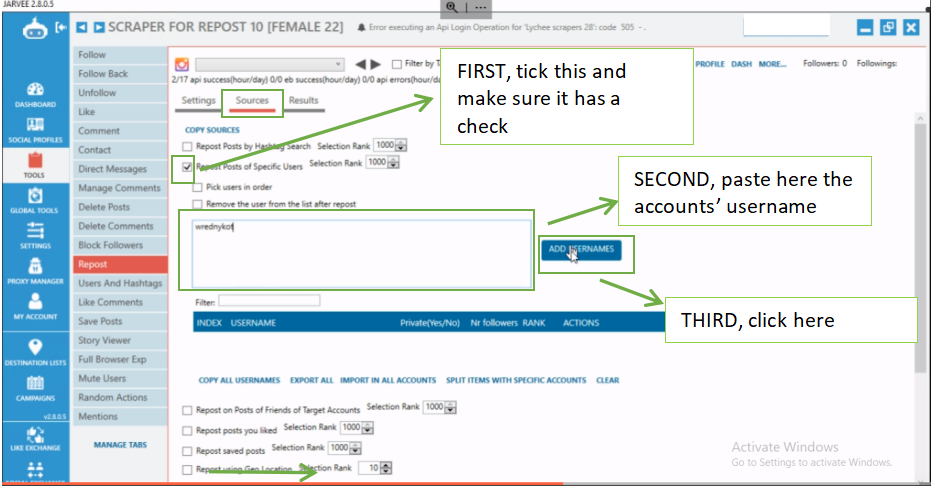
Next, go to SOURCES (right next to settings)
Follow the instructions on the picture
Note: AGAIN, you only need the USERNAME of the account that you use for reposting not the whole link .

After that, you need to go back to the settings and toggle START you run the reposting

This is how it looks like

So to check if it is really running ..
Go to CAMPAIGN

Look for the name of the campaign
Go to POST LIST

And as you can see there are two pictures, meaning it is running (more pictures will be added on the post list as time goes by)
Before you can call it for automation you also need to add PROFILE PICTURES to the AVATARS/ACCOUNT that you warmed up
So to add ..
Select one photo in the post list
Screenshot it
Go to an editor like CANVA or any editor you prefer
Save it in the server
Go to the avatar/account
Go to EDIT PROFILE
And click CHANGE PROFILE PICTURE

Select the PROFILE PICTURE that you edited
Then SAVE
Lastly, you need to buy FOLLOWERS, LIKES and COMMENTS for your account
Followers - you choose/select a trusted site where you can buy followers
Likes - you choose/select a trusted site where you can buy likes FOR YOUR SCRAPED IMAGES
Comments - you choose/select a trusted site where you can buy comments for your photos [ it depends on you on what kind of comments you wish to put, comments can be random or custom ]
We can recommend https://followiz.com/ in buying your followers, likes and comments. They also offer not just Instagram services but also others like Facebook, LinkedIn etc.
NOTE: It is important to buy initial followers, likes and comments for your account to look like a real account and establish credibility with Instagram.
AND THERE YOU FINALLY HAVE IT. Your account is good to go and ready for automation.